Showing posts with label SharePoint 2010. Show all posts

Saturday, January 28, 2012

SharePoint Visual Web Part with Exchange 2010 Integration

In this article we are going to show you how you can create new visual web part that connect to the Exchange Server and load the current user items. For this demo we will load only Calendar and Tasks items, but you can get all the other Exchange items using the same approach.

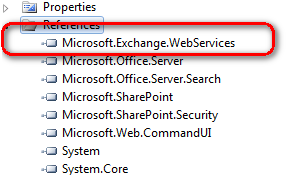
Before we start, we need to reference the exchange web service .DLL


Next step is creating new Visual Web Part in Visual Studio - this way it will be easier to maintain the UI later.


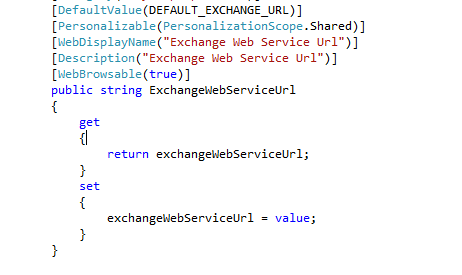
In ExchangeWebPart.cs we are going to create few properties we will need later - like Exchange Server Service URL, few configurations to define which items to show, limit the umber of items that will be loaded etc:


After we create all the properties we need, we have created a method that will pass the values of these properties to the actual web part (to the .ascx)

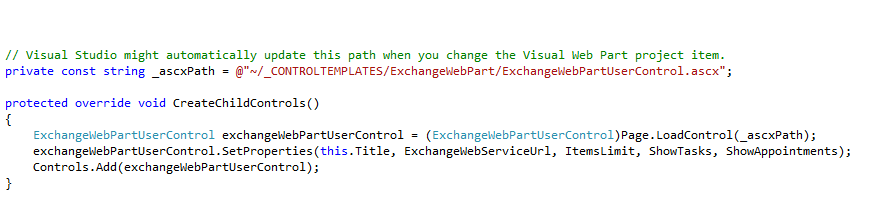
At this stage we have everything we need: visual web part, properties and values that are passed to the actual user control. Let's have a look at the .ASCX file: we are going to load the items in Grid View with 3 columns only: Type of Exchange item,Date and a "View Details" link:


Now come the interesting part. I have defined new DataTable variable on the page that will be used as a DataSource if the Grid View. Will fill the DataTable with items from the Exchange Server. Here is how the method looks that Initialize the table and initialize the Exchange Web Service (in this demo will use the Auto-discover option that will return the current user's  items:


Once we create the connection to the Exchange Server, based on the web part properties we will get different Exchange items (in this case Tasks and Calendar items):


And further more - let's show how Bind Calendar Items method looks like - nothing special here. Just insert new row in the datable using the data returned by the FindItems method of the Exchange Service. We added also a little additional logic that display the items Received Time if it is today, or display onlt the Date for older items - this is similar to how the Outlook looks like:


Everything is fine and now we can connect to Exchange, load Calendar items from there.. the last thing we are going to do is to load the item's data if the user click on particular item in the DataView. We are using standard RowCommand for this demo. You can also load the Exchange item in new pop-up window or lightbox, or some AJAX fancy control. It's up to you....

Here is how to get the real data for the item:


 The important call is this line:

Appointment appointment = Appointment.Bind(service, currentItemId, new  PropertySet(BasePropertySet.FirstClassProperties));

This is because FindItems return objects of type
Microsoft.Exchange.WebServices.Data.Item and based on this Item.ID we need to cast the object to the relevant Exchange item:

 I.E. here it is not to Bind the Tasks:
Task task = Task.Bind(service, currentItemId, new PropertySet(BasePropertySet.FirstClassProperties));

Once we bind the items, we can easily access the properties we need:

appointment.Start.ToLongTimeString();
appointment.Subject;
appointment.Body.Text;
This is it... nice simple and clear way to connect to Exchange Server using the Web Service (EWS)

The source code will be provided upon request.

Thursday, March 3, 2011

How to deploy a .UDCX file to a Data Connection Library using correct ListId

I'll try to give workaround on one of the most common problems related with InfoPath deployment. Probably everybody who had deployed InfoPath forms before knows about it.


The Problem: deploying InfoPath Forms to production
Once development is done, we need to move the form template from development to production. The problem is that we don't know the ListId in advance. According Universal Data Connection v2.0 Reference and Schema in MSDN the .UDCX file has the following structure:


<?MicrosoftWindowsSharePointServices ContentTypeID=”0x010100B4CBD48E029A4ad8B62CB0E41868F2B0”?>
<udc:DataSource MajorVersion="2" MinorVersion="0" xmlns:udc="http://schemas.microsoft.com/office/infopath/2006/udc">
    <udc:Name>Main submit</udc:Name>
    <udc:Description>Format: UDC V2; Connection Type: SharePointLibrary; 
Purpose: WriteOnly; Generated by Microsoft Office InfoPath 2007 on 2010-07-13 at 16:04:26 by 
DEV\svc_mossfarm_vm0150.</udc:Description>
    <udc:Type MajorVersion="2" MinorVersion="0" Type="SharePointLibrary">
        <udc:SubType MajorVersion="0" MinorVersion="0" Type=""/>
    </udc:Type>
    <udc:ConnectionInfo Purpose="WriteOnly" AltDataSource="">
        <udc:WsdlUrl/>
        <udc:SelectCommand>
            <udc:ListId/>
            <udc:WebUrl/>
            <udc:ConnectionString/>
            <udc:ServiceUrl UseFormsServiceProxy="false"/>
            <udc:SoapAction/>
            <udc:Query/>
        </udc:SelectCommand>
        <udc:UpdateCommand>
            <udc:ServiceUrl UseFormsServiceProxy="false"/>
            <udc:SoapAction/>
            <udc:Submit/>
            <udc:FileName>Specify a filename or formula</udc:FileName>
            <udc:FolderName AllowOverwrite="1">/Lists/SubmittedFormsLib/</udc:FolderName>
        </udc:UpdateCommand>
        <!--udc:Authentication><udc:SSO AppId='' CredentialType='' /></udc:Authentication-->
    </udc:ConnectionInfo>
</udc:DataSource>
 

Let's focus on  the ConnectionInfo Element and especially on the SelectCommand Element


Most common practice is to generate this .UDCX file with InfoPath using the Convert button on the Data Sources form. Once converted the ListId element is hard coded with the GUID of a list... cool, uh? That makes the .UDCX file absolutely useless when we need to deploy it to some other server.


Suggested solution
I read numerous articles describing that specifying a list by name in an .UDCX file instead of the ListId works fine, but actually I never managed to make it work.
Even I tried with the name of the list, the internal name of the List, relative path of the list, absolute path.... it never get working. I was still receiving an error when I open the InfoPath form.

So finally I stop trying to find a working "hack". In my vision putting ListName when it is explicitly specified in MSDN that the .UDCX file expect ListId is either bug in SharePoint or "hack"

My workaround
As replacing ListId with Name doesn't work for me I created new feature that basically read all of the files in the Data Connection Library and manually update the relevant List IDs

First of all we need these steps:
  • Create new feature that deploy the InfoPath Forms
  • Create new feature that deploy the InfoPath Data Connection Files (.UDCX)
  • Create new feature that update uploaded .UDCX files
  • Add EventReceiver to our InfoPathDataConnectionUpdate feature
  • Add Feature Activation Dependency (we need InfoPathDataConnection feature to be activated before InfoPathDataConnectionUpdate)
And here is that we have in our InfoPathDataConnectionUpdate.EventReceiver.cs


First let's define 2 constants that we need. Infopath Data Connections library is standard out of the box library, so we search for it by name (no need to use GUID in this case)


And here is our method UpdateDataConnectionLibrary that actually get the connection file and simply update the xml node that contains the ListId. Have in mind that in my solution the names of the Lists are exactly the same as the names of the .UDCX files:


So for all of these .UDCX files I have coresponding lists/libraries that are names exactly the same way:
ApplicationsUsed
Criticality
Effectiveness
....

This way in the event receiver simply use the item.DisplayName in the foreach
foreach (SPListItem item in web.Lists[InfopathDataConnections].Items)
{
       //Main Submit udcx is used for submit only. No need to update ListID
       if (item.DisplayName == "Main Submit") continue;
   
      UpdateDataConnectionLibrary(web, item.File, item.DisplayName);
}

Otherwise you should create your own mapping that map the .udcx file with the corresponding SharePoint list. Anyway best practice is to have exactly the same list name as the data connection file

You can download the event receiver from here

Saturday, January 1, 2011

SharePoint 2010 Backup/Restore farm

Following article will show how to backup/restore SharePoint 2010 farms using shell script.
Power Shell Commands
Here are the shell commands that are used to backup/restore: 
Backup-SPFarm -Directory <BackupFolder> -BackupMethod {Full | Differential}
Restore-SPFarm -Directory <BackupFolder> -RestoreMethod Overwrite

Considerations and Prerequisites

First of all let’s start with little guidance about backup/restore procedures:
  • By design to restore a database is required at least 1 Full backup and the rest can be only Incremental backups. In order to save space we can perform Full backups on weekly bases and Incremental on backups on daily bases. However for large databases incremental backups are recommended.
  • Store a copy of backup files off-site
  • Backups should not be performed during operation hours to prevent data loss
  • Farm administrator account needed to perform the backup/restore operations
  • Valid AD accounts required to be used for SharePoint service accounts. Otherwise after restore the farm will not be operational. 

Backup procedure:

·         Open SharePoint Management Shell and type the command
    Backup-SPFarm -Directory <BackupFolder> -BackupMethod {Full | Differential}


Restore procedure

Open SharePoint Management Shell and type the command
Restore-SPFarm -Directory <BackupFolder> -RestoreMethod Overwrite
(command and parameters can be entered separately like below)


Then SharePoint will automatically list all Web Applications that are found in the backup:

Then SharePoint will ask user to provide credentials for the accounts that will be used to run the SharePoint Services. Depends on the installed services before the backup there are different accounts that needs to be provided. Few of the required accounts (listed as an example):
 - SP config account
- SP application pool account
- SP Search account
(below shown SP asking for Shared Services Application account)
 

Limitations of backup/restore

  • You cannot restore a multiple-server farm to a single-server farm or a single-server farm to a multiple-server farm
  • You cannot back up from one version of Microsoft SharePoint Server and restore to another version of SharePoint Server
  • Configuration and Central Administration content databases are not being restored by design from Microsoft SharePoint Server 2010 tools. There are 2 options to move  configuration databases (SP_Config):
o   Manually restore using SQL Manager
o   Install and configure SharePoint on the new environment, so it has its own configuration database and re-configure it.  LDP ha only few custom configurations that needs attention – Shared Services Provider (SSP), Search configuration and schedule, AD connector
  • Some of the service applications cannot be started automatically after  the restore operation and needs to be started manually (Using Central Administration or Power Shell)
  • Servers should have identical components installed! For example if you backup SharePoint farm with Enterprise Edition, Fast Search and BDC Connector configured, this backup cannot be restored on server with SharePoint Server Standard or Foundation or on server without Fast Search.

Useful links:
http://technet.microsoft.com/en-us/library/ee428316.aspx

http://technet.microsoft.com/en-us/library/ff607965.aspx

Sunday, October 10, 2010

Move ribbon row above the menu and below the logo

Ribbon - to like or not to like?

During my meetings with the clients, I've been asked numerous times the same question "Can you move the ribbon above the menu?" Personally I like it more this way as the SharePoint site looks like normal web sites that we see all the time: header that contains logo, slogan and some more stuff and then the top menu.

Here is how standard Team site looks like, especially the ribbon that is on the very top of the page:

Before customizing the master page, let's enable the publishing infrastructure - this way every change of the master page will require approval before actually appears on the site. This approach also minimize the risk of breaking the site by saving broken master page. Let's show it in steps:

Step 1 - First of all let's activate the "Server Publishing Infrastructure" for Site Collections

   1. From the site, go to Site Actions and select Site Settings
   2. Under Site Collection Administration and chose Site Collection Features
   3. Activate the SharePoint Server Publishing Infrastructure

Step 2 - next we need to  activate "Server Publishing" for the Site

   1. From the site, go to Site Actions and select Site Settings
   2. Under Site Actions chose Manage Site Features
   3. Activate the SharePoint Server Publishing

Step 3 - edit the master page in SharePoint Designer

  1. From the site, go to Site Actions and select "Edit in SharePoint Designer"
  2. After SharePoint Designer is loaded, open the "Master Pages" in the left menu

    Next 3 steps will create new master page (I always recommend new master page rather then customizing the default one).
  3. From the Top Ribbon click the button "Blank Master Page" and enter some name
  4. Right click on the new master page and select "Edit File in Advanced Mode"
  5. Copy and Paste the HTML from the default v4.master
By default the HTML for Ribbon is on the top of the master page after the start body tag:

 Now let's move the ribbon. actually we are going to move the row that contains  the Logo of the site and the short description: it will be a bit easier as it contains less HTML then the ribbon.

  1. So find the following code in the source: <div class="s4-title s4-lp"> and simply right click and select the option "Select Tag":
  2. Cut the whole HTML that is selected
  3. Paste the HTML above the ribbon row which is
    <div id="s4-ribbonrow" class="s4-pr s4-ribbonrowhidetitle">Also shown below where to paste the HTML: 
After doing this simple step we managed to get this:


 Here are few more examples how this small change affect the whole look&feel of the site: