Branding of the site is one of the most important tasks for every SharePoint project. These days everybody is using SharePoint for collaboration... every day...every hour.. even every minute. SharePoint become an essential part of the working day. In other word branding is important.
What is the main goal of this posting. Probably every body knows how the standard Team Site looks:


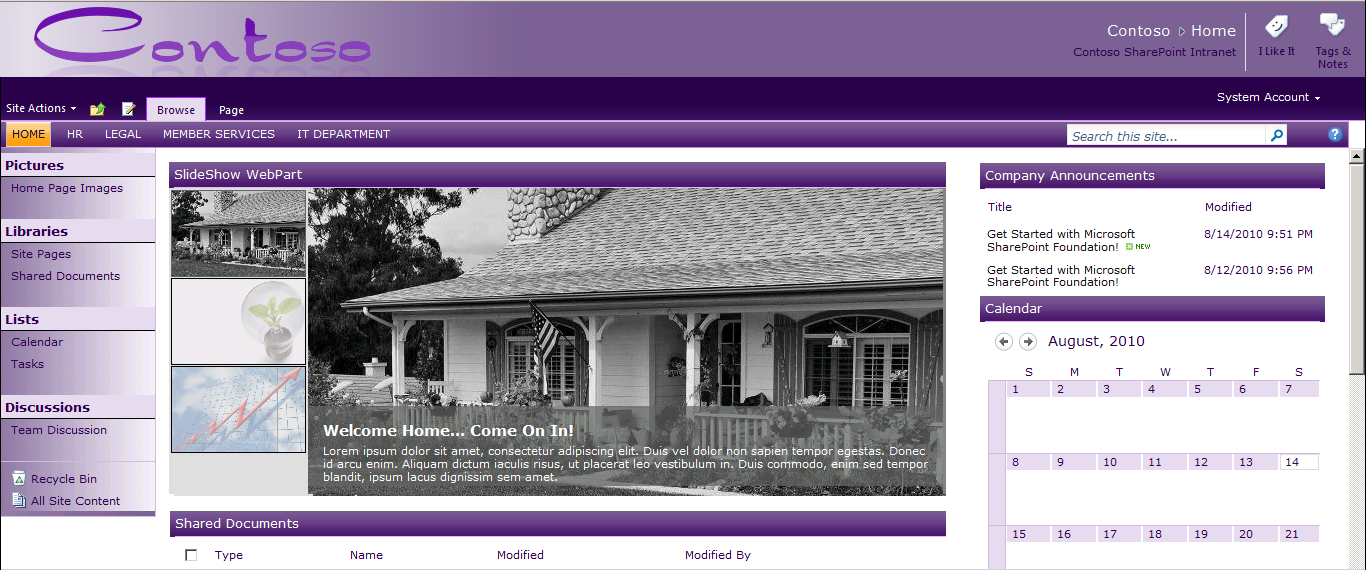
After reading this post, you will be able to create really cool home page in an hour. This is what we are trying to achieve:
So... everything we need is: SharePoint Designer 2010, Microsoft Office 2010 and MS Paint. I like more www.paint.net but the good developer can use any tool!
First time when I've done custom design of SharePoint site, I've been struggling a lot... SharePoint Designer 2007 was not that good, so I messed up the things and broke the whole site, because I drag & drop some content by chance. These days are gone...Microsoft finally did excellent job especially when somebody need to customize the master pages.
Before the actual work, let's quickly describe the 5 simple steps we are going to do:
- Create new theme in PowerPoint and then import into SharePoint
- Add custom CSS class in the master page
- Create few additional images that will be used for backgrounds
- Redesign some of the SharePoint build-in elements
- Add some fancy content to the home page
So after a brief summary we are ready to start....3....2....1....go:
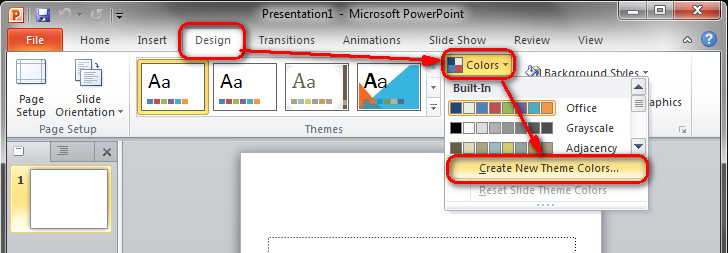
Step 1: Create new theme in PowerPoint and then import into SharePointIn 2010 you can create theme in any Microsoft Office application you have around: Word, PowerPoint....just export and import in SharePoint. So let's open PowerPoint, create new theme and save it to our local PC:
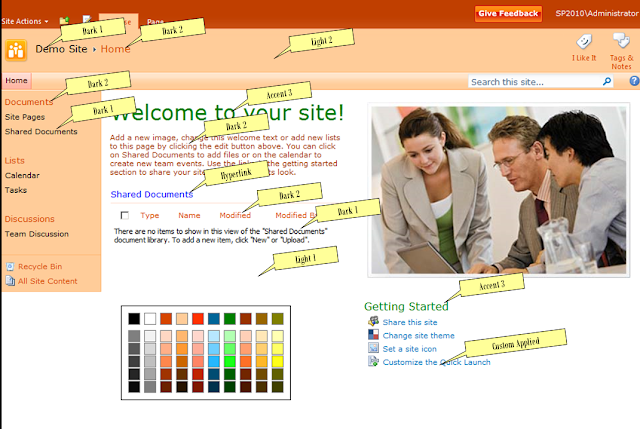
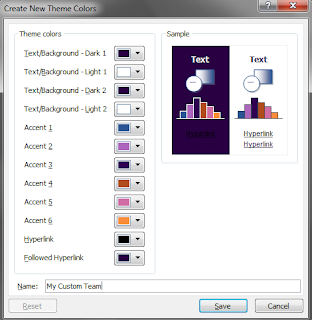
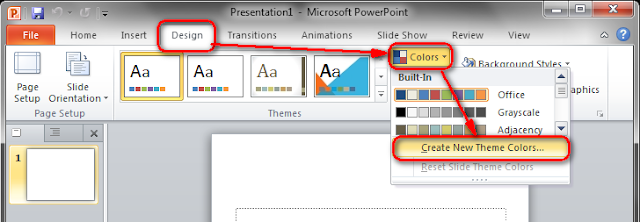 Then we can enter some colors.... If you don't know what these colors and accents means have a look at this picture. I believe in visual mapping - you need to see where it stands in order to know what color to put. good news is that you can always modify the theme from SharePoint and use the preview option (even it is working a kind of slow...)
In this particular presentation I used these colors (all files supplied at the end of the presentation)
 Now all need to export the .thmx file and import it in SharePoint ... that's it. Simple enough ;) ?
To upload the theme into Theme Gallery either go to /_catalogs/theme/Forms/AllItems.aspx or:
Now the new theme will appear in the Theme Gallery . So let's go and apply the new theme to the site:

In this particular presentation I used these colors (all files supplied at the end of the presentation)

To upload the theme into Theme Gallery either go to /_catalogs/theme/Forms/AllItems.aspx or:
- Open your SharePoint site
- Click Site Actions
- Click Site Settings
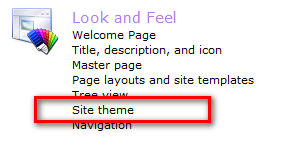
- In the Look and Feel section, click Site theme
- At the top of the page click the Theme Gallery link
- Click the Documents tab
- Click Upload Document
- Click Browse
- Browse to the MyCustomTheme.thmx file you created and select it
- Click OK
- Click Save
Now the new theme will appear in the Theme Gallery . So let's go and apply the new theme to the site:
- Go to Site Actions -> Site Settings
- In the Look and Feel section click "Site theme"
- In the "Select a Theme" section select the theme we just uploaded.
- Click apply

Step 2: Add custom CSS class
At this point we need SharePoint Designer ... so.... go ahead and click "Edit the site in SharePoint Designer".
Before doing any change I would strongly recommend to create new master page and copy the content from the default v4.master. It is useful to have v4.master in case you need to roll-back some changes or check some placeholder name/position.
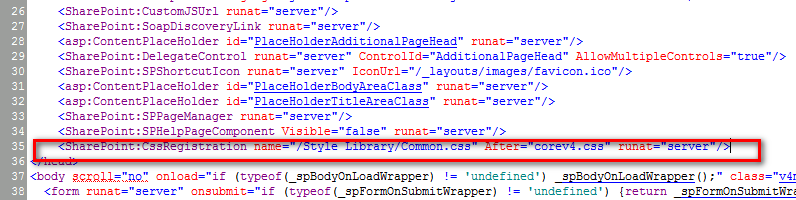
The easiest way is referencing your custom CSS in the header:
- Edit the master page in advanced mode.
- paste in the following in the <head> section:
- <SharePoint:CssRegistration name="/Style Library/Common.css" After="corev4.css" runat="server"/>
- Save/Publish the page. At this point the site will now have the custom CSS applied.
Step 3: Create few additional images that will be used for backgrounds
One of the things I dislike a lot is the headers of the list in sharepoint. I know they are a way better then 2007, but still I don't like them. So every time I create new branding site, I put some custom backgrounds for the headers that override the dynamically generated header images from SharePoint.
The easiest way is to create a small image that can be used for background. Here is what I am doing. After applying the theme SharePoint automatically generate the faded images that are used for backgound of the headers.
I like the styling of the SharePoint dialog box, so using FastStone Capture or paint.net (find link at the bottom of this article) I just cut a small piece of it that I am going to use as a background for all headers
Using this approach I created 4 different background images that we will apply:

All images that were created can be found at the bottom of the page in attached zip file.
Step 4: Redesign some of the SharePoint build-in elements
I am going to do some modifications on the page. Let's do it step by step

- Move the ribbon below the top menu. I have separate posting on this topic...
How to move the whole ribbon row - Change the background of the top area - this way we gonna add some nice fading. Let's do it by overriding the CSS class generated by SharePoint. First let's see what is the current class applied to the top header.
- open the site in FireFox and turn on FireBug
- select the top are, right click and choose the option "Inspect Element" 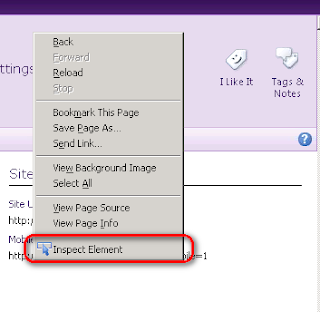
- This way we can see that the class that set the background image ans we need to override is .s4-title
So let's just add some custom background image and some custom background color:
.s4-title
{
background-image:url('/SiteAssets/top_nav_bg.png');
background-repeat: repeat-y;
background-color: #7B6194;
}
Using the same approach (grab the class using FireBug and override the CSS) we basically create additional styling for left menu, for top menu and all headers of the SharePoint elements. Let's show it again:
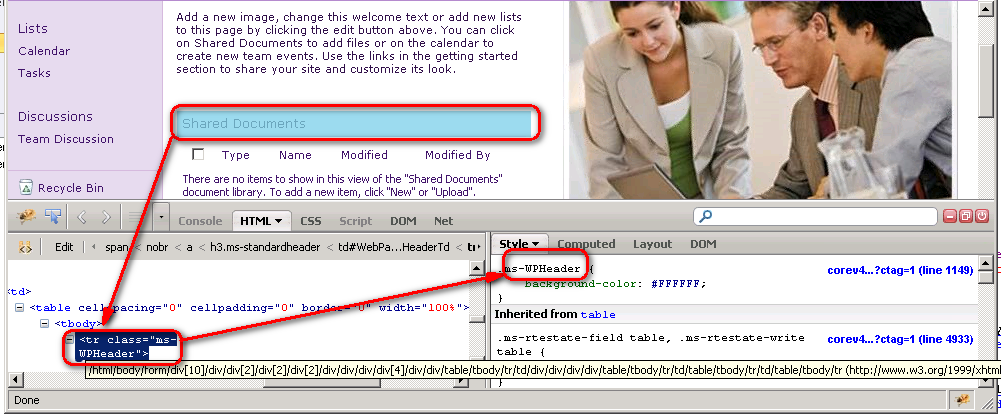
step 1: Grab the required class with FireBug (right click and choose "Inspect Element")
step 2: find the appropriate class we need to override:
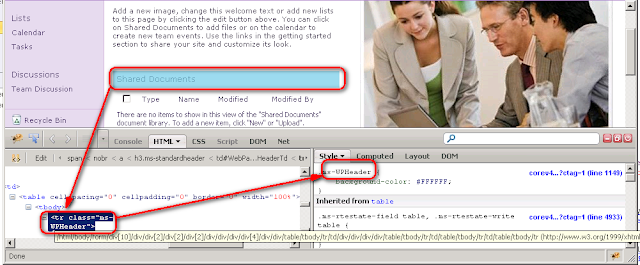
step 3: create custom CSS class that override it:
.ms-WPHeader
{
background-image: url("/SiteAssets/top_nav_bg.png");
background-position: right top;
background-repeat: repeat-x;
height:27px;
}
step 4: add it to our Custom.css
- Use the same procedure to:
- move breadcrumbs and site description to the right side of the header (this way the logo will stay on the left). Here is the CSS:
.s4-titletext
{
text-align: right;
}
- add custom background image to the left menu area:
.ms-quickLaunch
{
background-image: url("/SiteAssets/side_bar_bg.png");
background-position: right top;
background-repeat: repeat-y;
} - add custom background image to left menu headers:
#s4-leftpanel-content
{
background-image: url("top_nav_bg.png");
background-position: right top;
background-repeat: repeat-y;
color: #FFFFFF;
}
.menu-vertical ul.root > li > a
{
background-color: #E7DBEF;
color: black;
border-bottom: 1px solid black;
font-weight: 600;
text-decoration: none;
} - add custom background to top menu:
.s4-tn
{
background-image: url("/SiteAssets/top_nav_bg.png");
background-position: right top;
background-repeat: repeat-x;
color: #FFFFFF;
} - add custom color to top menu selected item. Let's use Dark Orange - like LA Lakers ;)
.s4-toplinks .s4-tn a.selected {
background-color:#FF9E10;
color:#09111D;
} - transform all top menu items to be uppercase:
.s4-tn .menu-item-text
{
text-transform: uppercase;
font-size: 11px;
}
- move breadcrumbs and site description to the right side of the header (this way the logo will stay on the left). Here is the CSS:
- use custom larger logo that is transparent, so we can see the fading of the background.
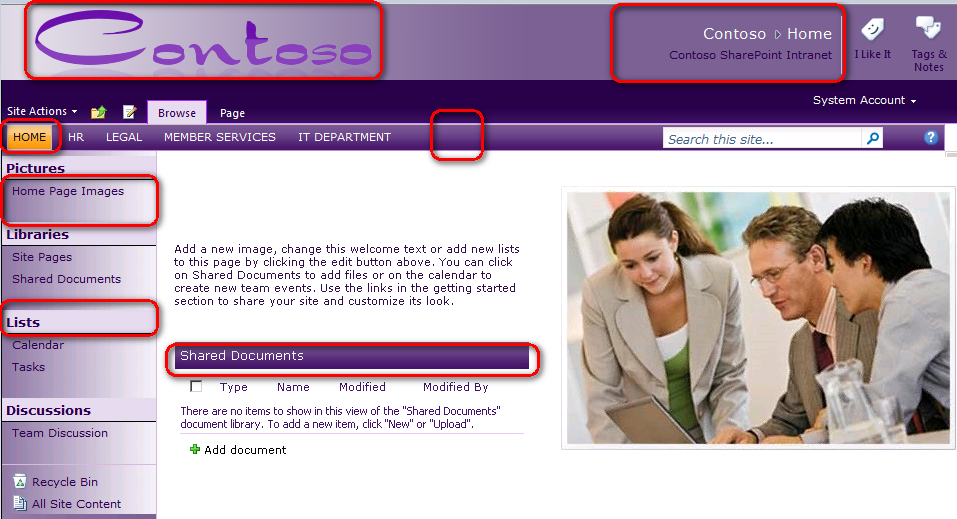
Step 5: Add some fancy content to the home page
Last thing we should do is add some fancy content to the home page. In my case I used SpZab Frontpage Slideshow which is pretty cool slideshow that use SharePoint list for data source and JQuery to display the content.
So I just added this slideshow to the home page, and pick up 3 random images from my PC and now the home page become interactive, with moving content and much better design from the standard OOB design.
And here is the result:
Few important advices:
- If publishing is enabled do not forget to publish major version, otherwise only you will be able to see the changes.
- Always create new master page and set the new .master as Default/Custom Master page. Do not update the default one: if something happen with your custom master, you can always revert it back to the default
- Be careful when overwriting generic HTML elements (like BODY, FORM, INPUT, SELECT, UL. LI) in the custom CSS files. SharePoint is calculating the size of the elements dynamically and if you override some important html elementa, you might easily break the page design
- Additional tools and files used to prepare this demonstration:
- FireBug add-on by Firefox (to capture the CSS of rendered page)
- ColorCop - small, lightweight and really cool application to capture some colors (also automatically copy the selected color, so you no need to press Ctrl+C)
- paint.net - really nice: small, powerful and.... FREE program for image editing based
- FastStone Photo Resizer - I am always using it for mass updating/resizing of images. A must for every web designer
- DESIGN MATERIALS used in the presentation: DOWNLOAD HERE
12 comments:
Cool article man. Helped me a lot. Can you send me also the master page file? It is missing from the zip file.
Really thanks. it's very useful.
Thank you so much for the article. I just finished going through all the steps but I don't see any changes except for the new theme in installed. I did publish a major version but still no changes. I'm working on Sharepoint Online I'm not sure that makes any difference.
Thanks,
Peter.
how can we change a page background image instead or bg-color, similar to watermark in word.
Thank you so much have looked for this for a very long time.
Very informative, thanks for sharing. I need to export images information inside SharePoint . During my search I have found Aspose.Imaging for SharePoint. It export images to supported image formats (PNG, JPG, BMP, GIF, TIFF and PSD etc. Here is the link: http://www.aspose.com/blogs/aspose-products/aspose.imaging-product-family/archive/2013/11/11/introducing-aspose.imaging-for-sharepoint.html
Any recommendation from your side
Many Thanks
Could you please explain how to add the frame for Company announcements and populate the same ?
Hi,
New to coding and SharePoint, I have tried to follow all of the steps, but I am having trouble.
The only change I have managed is to move the Ribbon Row.
I think my main issue is that I may be refere the custom CSS incorrectly...but I have no idea.
Also it seems that the design materials link is no longer working.
Please advise, and thanks in advance.
DOWNLOAD HERE doesn't work :(
Yes the Download Here does not work. Can someone fix this?
Hi, Good stuff, the Download Here does not work. Can someone fix this? Thanks!
Post a Comment